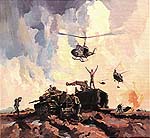
Cutting Tank Track under Tension

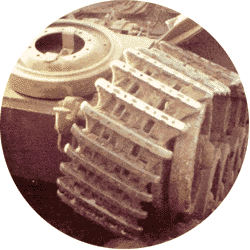
If a Centurion Tank contoured along a slope, the side forces could cause the track to dislodge from the front Idler or the Final Drive or both, placing the track under such tension that RAEME assistance was needed to break the track. See the Locked Tracks article.
This Article describes how we broke tracks under tension.
Cutting with a torch
My first experience occurred of using an Oxy Acetylene torch to cut a track was when we were on an exercise with a troop of tanks in the Blue Mountains south of Singleton in the early nineteen-sixties.
One of the tanks had slipped off the fire trails we were using and threw both tracks badly, and had to be cut off. They had come off to the degree that both tracks were off at the final drive and the front idler wheels
Not having had to do this before I was informed by my off sider one Cfn Joe Topping that he had done one in Pucka He started in to do the job, cutting the track at the front between the front idler and the first road wheel
I could see that as he was cutting the track, it was starting to spread because of the tension. Not wishing to tell him how to do the job because he had been in tanks longer than I, I stopped him cutting and showed him what was happening, I thought that because of his dark glasses he could not see it. "She'll be right," says he, and continued cutting.
Next minute, wham!; the track let go nearly taking his head off. It flew up and took off the front mud guards back to the bins.
!!! LESSON LEARNT !!!
When it came to cutting the next one I suggested that we excavated an hollow under the track between the first set of road wheels and the second and cut there. That way the track would be held by the front road wheels and have the tendance to hold the track when it split and stop it flying apart at speed. It worked.
I recommend that tracks under tension should always be cut in this position.
Track Cutting with explosives
In my opinion the use of explosives was safer and quicker. The theory of explosives is such that a shaped charge inverts its self, in that the knife edge of the upper part reverts to the under side becoming a knife edge, the same theory of the RPG war head that bores through the tank hull
The Munro Effect
In the 1808s, a Dr Munro was experimenting with using cast blocks on guncotton (nitrocellulose impregnated with nitroglycerin) for the war heads of US navy torpedoes. The blocks had been cast with an indented identification number.
He observed that when a block was detonated against a steel plate with the identification number towards the plate, a mirror image of the number was left in the plate.
The Germans and Swedes found that a metal liner enhanced the effect.
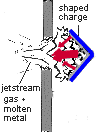
Based on Munro effect, the RAE method works in this way.
On detonation a shock wave is sent through the shaped charge, the explosive force being concentrated on the axis of the cavity. The apex of the metal liner begins to deform being pushed out by extreme pressure and, under the forces, becomes plastic converting the liner to a narrow jet of plasma. The stream of very hot gases under high pressure moving at hypersonic speed penetrates the target
The technique used to cut tracks with explosives were devised by the Sappers at the School of Military Engineers in Sydney. I attended the School of Engineers and instructed students on the Advance Recovery Mechanics Course at Bandiana the method of track cutting. An EMEI (Engineers) set out the theory and method.
When I was instructed at the school we only had pieces of inert track on the ground,not under any tension. I differ somewhat in my positioning of the cutting charge, to that shown in the EMEIs
Materials Required
- a blasting tray made from 8 gauge (4mm nom) sheet steel.
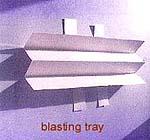
- sufficient PE 3 ( Plastic Explosive ) to fill both sides of the tray, approximately 1 pound (half kilo),
- 1 CE primer, and
- either, 1 detonator, and,a pre determined length of safety fuse
- or, an electrical initiated detonator in lieu of safety fuse initiated type.
Method
- Prepare the Cutting Charge
- Fill the blasting tray with explosive
- Test the fuse by taking a length of safety fuse and cutting into three equal lengths. With a sulphur match test the first length and time of burning. Take the length from the other end and test.
- When satisfied with the burning time insert into the detonator and crimp.
Note: The length and burning time of the fuse should be sufficient to allow the operator time to adopt a position of safety, inside the tank or on the opposite side of the vehicle. - insert the detonator into the primer
- Place the primer and detonator in the centre of the main charge. The cutting charge is now ready to use.
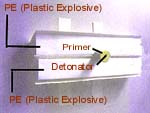
NOTE ,
- Place the charge
- Excavate a hollow under the track where you are to place the cutting charge.
This should be centrally under a track link and between two suspension stations, preferably between the first two or the last two to reduce the chances of the track ends flying free and causing further damage or injuries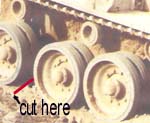
- Excavate a hollow under the track where you are to place the cutting charge.
- Firing
- Place the cutting charge on the track link between the track pins and and weigh down with sand bags.

- Using a sulphur match light the fuse, move to the safe zone, DO NOT RUSH ! await the detonation, if the charge fails to explode sufficient time must be allowed before checking the failure (I NEVER HAD ONE) this of course depends upon the situation prevailing in the time of war.
- Place the cutting charge on the track link between the track pins and and weigh down with sand bags.
- When using an electrical detonator to fire the charge, take the following precautions:
- With the use of a length of two core wire (Don Ten from the coaxial reel on the tank will suffice) cut a length that will allows you to assume a safe position from the cutting charge, behind a road wheel on the other side of the tank at the farthest point from the charge; or in the vehicle itself.
- Lay out the wire from the charge to the safe position. At the safe position ensure that the two ends are of slightly different in length so as to make sure they do not connect one with the other.
- When you have reached this point and the cutting charge is ready, positioned over the selected track link, connect the two wires to the detonator and insert the detonator into the CE primer located on the main cutting charge. The charge is now ready to fire.
- Return to the firing safe
position with the means of ignition,
- if using a firing plunger to fire the charge, connect the wires to the plunger, raise the plunger to its full extent and on the warning, "Fire In The Hole" press the plunger fully home.
- If using a battery, (I only ever used this in practice) connect a wire to the negative terminal,and on the warning, "Fire In The Hole", flash the other to the positive terminal; a six volt lantern battery was sufficient.
- Always ensure that there are no personnel in the danger area before firing the charge. If the charge miss fires wait a safe period of time before you approach to check and reset same. This is dependant upon the circumstances prevailing at the time such being in action in a Area of Operations.

I recently reread Sandy Tocock's article on Cutting Tracks and I was reminded of my first, and only, effort in that art.
As many may remember the 1st Armd. Regt and its attendant L.A.D. were allowed to waste away with many experienced "tankies" being posted to the newly formed Cav outfits. This was the lull period before the decision was made that maybe there was a place for heavy armoured vehicles in Vietnam. Many of the reinforcements to the Regt. were National Servicemen just out of the Armd.Centre.
One result of this was that a green troop officer decided that his troop would cross one of the many dry gullies on the Puckapunyal Range at other than a recognized tank crossing; After all,
Tanks will go anywhere — Won't they?
No, they won't, and one callsign wound up halfway up the exit slope from the gully with the left hand track off at the front idler and a good 1½ metres of track hanging out over the edge.
Now I had an equally green (and undermanned) L.A.D Squadron Section which meant a more hands on approach than if we were at full strength. It appeared that the wise thing would be to position the ARV (Armoured Recovery Vehicle) uphill of the casualty and have it anchor the casualty by use of the tank's own tow rope (I had no concept of what effect cutting the track in that location would have and safety first seemed like a good idea).
We manhandled the oxy bottles down into the gully bottom and placed them at the length of the hoses (about 3 metres) from the job and with great trepidation I set in to cut the track between the rear sprocket and the last roadwheel. All was going well till with one web section of the track still to go I noticed the track was starting to stretch.
I stopped cutting long enough to warn the onlookers to keep clear and to check on my own situation, my plan went like this: I resume cutting and when the track breaks I turn of the torch and step back (WO2 Cool Personified).
I didn't get to complete the cut when the track let go with a
very loud bang
I picked myself up at the full extent of the oxy hoses with the torch still alight but at the other side of the bottles. I'm told that I got there very quickly but in truth I couldn't tell you any more than that when that track went off I thought it had me.
From that point on the job went as per the text book, the casualty sustained no further damage and the ARV anchor proved superfluous but given the same problem today I believe I would still go about it the same way with one exception:
I'd get some other sucker to cut the track
